
Published on: 08 Aug , 2023
How to Zoom In on Videos
On this page
In today’s fast-paced digital world, video has become an important tool for businesses. It not only helps with customer service, marketing and promotions, but it also helps to engage customers. But the power of video goes beyond just creating a connection with your audience—it can also be used to highlight key details that make all the difference.
To do this, you’ll need to learn how to pan and zoom in on recorded videos and add a zoom effect. This is an easy process if you have the right tools and know which steps to take. Let’s get started with learning how to zoom in on videos!
Understanding the Power of Zooming in Videos
Before we look at how to add zoom effect to a video, it is important to understand why video editing zoom in effect is important. Some of the major benefits of adding zoom visual effects are:
- Adding zoom effects to your videos allows you to highlight important details.
- It helps focus on specific areas of a video that might be hard to spot on a regular viewing.
- It adds more life to your videos and breaks up long, monotonous shots.
- Zooming in can help you create engaging intros and outros for your videos.
Now that you know the benefits of zooming in on videos, let’s take a look at the challenges to zoom in on a video and save it.
Common Challenges With Zoom In Effects On Video
Video zooming may seem straightforward, but editors often encounter some challenges on Mac as well as Windows desktop. Here are a few common issues and how to overcome them:
- Loss of video quality: Excessive zooming can decrease the video quality. To solve this, use a high-resolution video format and avoid extreme zooms. Also, some video editing software includes features that can enhance the quality of zoomed-in areas.
- Difficulty in achieving smooth zoom: Creating a smooth, professional-looking zoom can be difficult, especially for beginners. If available, practice using the software's zoom controls and use features like easing (a technique to make transitions look more natural).
- Finding the right timing: Knowing when to zoom in and out can be tricky. It often comes down to the content of the video and the story you're telling. A good rule of thumb is to use video zoomer to highlight key moments or details crucial to the viewer.
- Keeping viewers engaged: Viewers can easily get disinterested in the video if there are too many zoom effects or if the transitions are too distracting. Use zooming to create a cinematic feel and draw the viewer's attention. Make sure the transitions are quick. But, they should not be too flashy, as this can break the flow of your video. Don't forget to consider the rhythm of your video. Consider how it will affect viewers' engagement with the content.
- Keeping it uniform: Video editors can unknowingly add too many zoom effects or use them inconsistently in a video file. While some zooming may be necessary for certain videos, too much can make your video look amateurish and unprofessional. When editing a video, zoom levels should be consistent throughout the duration. This will help you maintain a professional look and feel for your project. It will create a more engaging experience for viewers.
Video Zoom Made Easy With Trainn
Zing, Trainn's video creation tool, has all the features you need to zoom into video or image and make them look professional.
With our easy-to-use tools, you can easily add and remove smooth zooms, adjust the speed, and the timing of transitions right from your dashboard or web browser, using the scroll wheel or keyboard shortcuts.
Plus, there’s a ton of other video editing features available to help take your videos to the next level.
Here's how to add or remove Zoom to your videos with Zing:
Adding Zoom to Videos
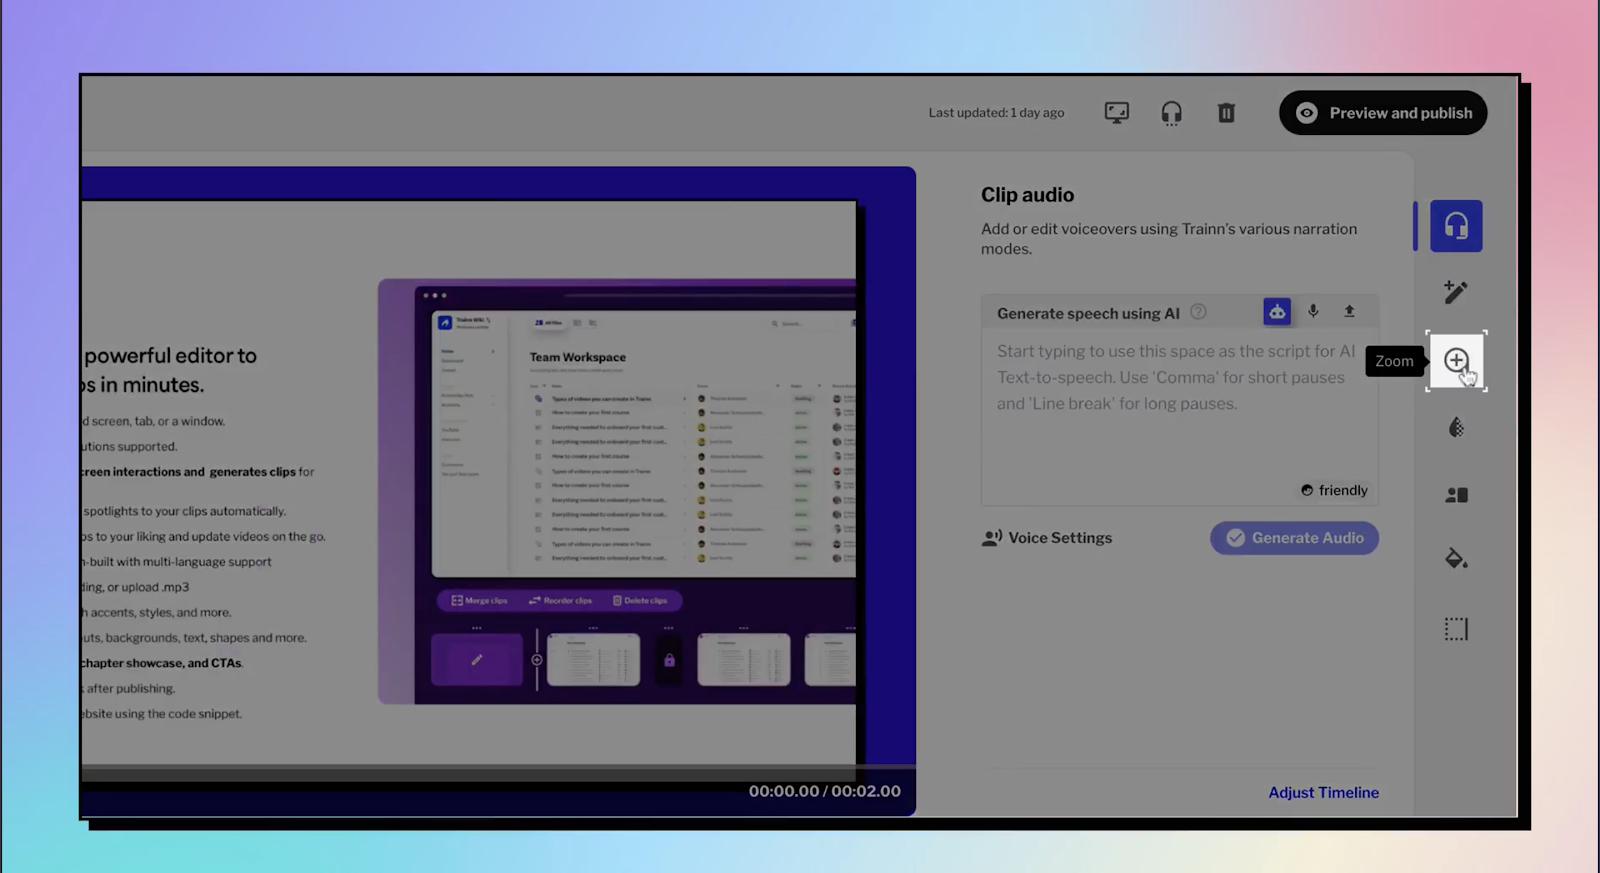
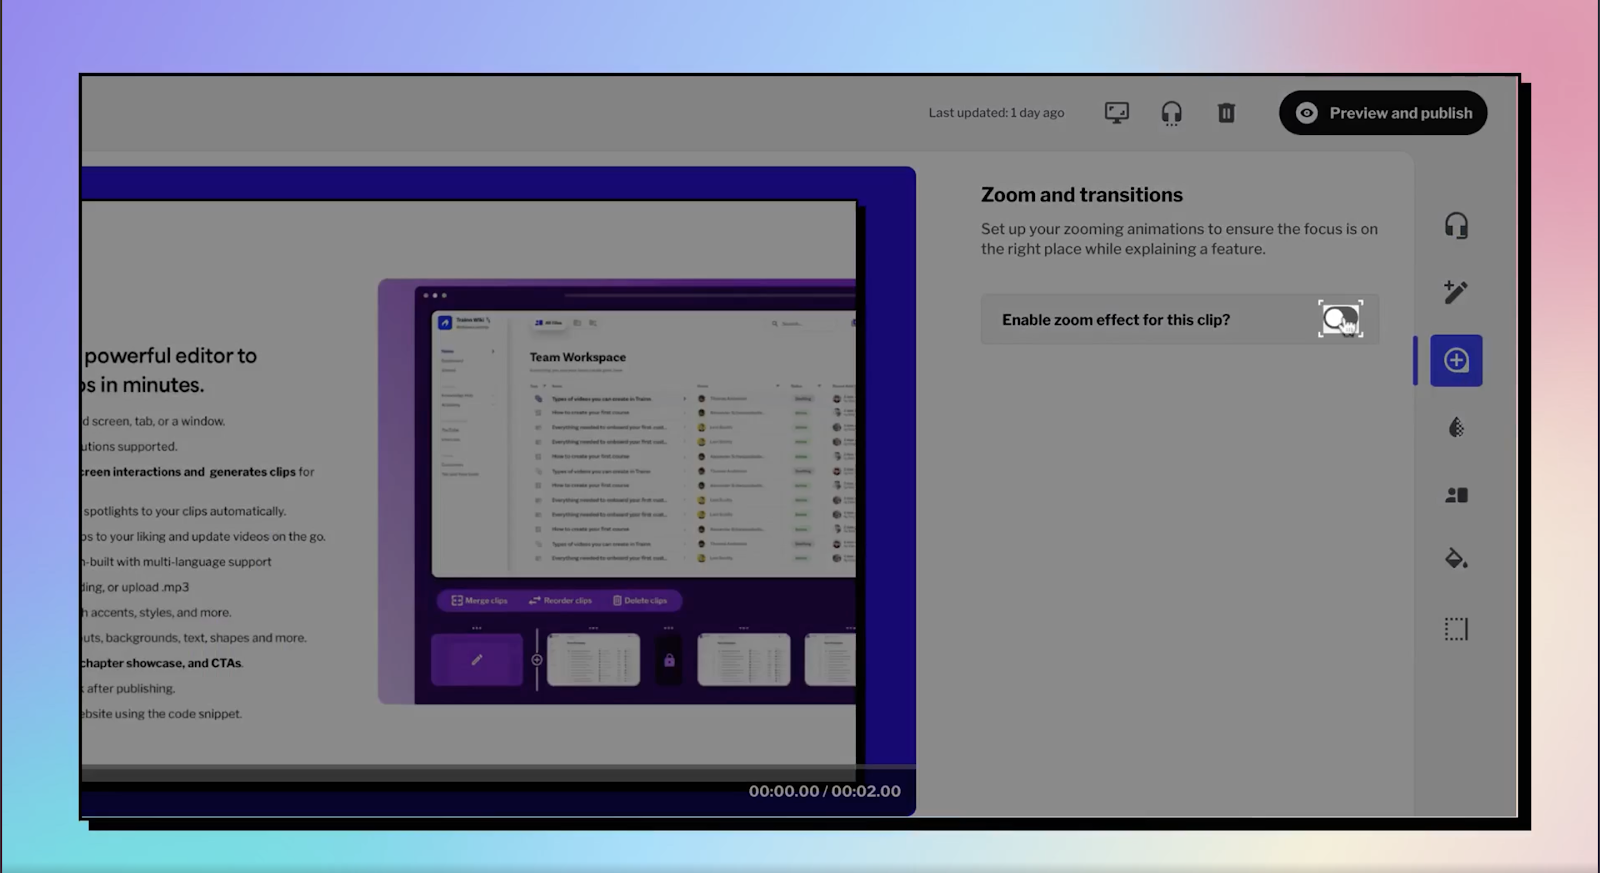
To add the zoom effect to a video, simply navigate to the video editing page and click on the Zoom option on the right-hand side panel. Next, turn on the 'Enable Zoom Option for this clip?' option. You can then select from a variety of zoom options, such as:
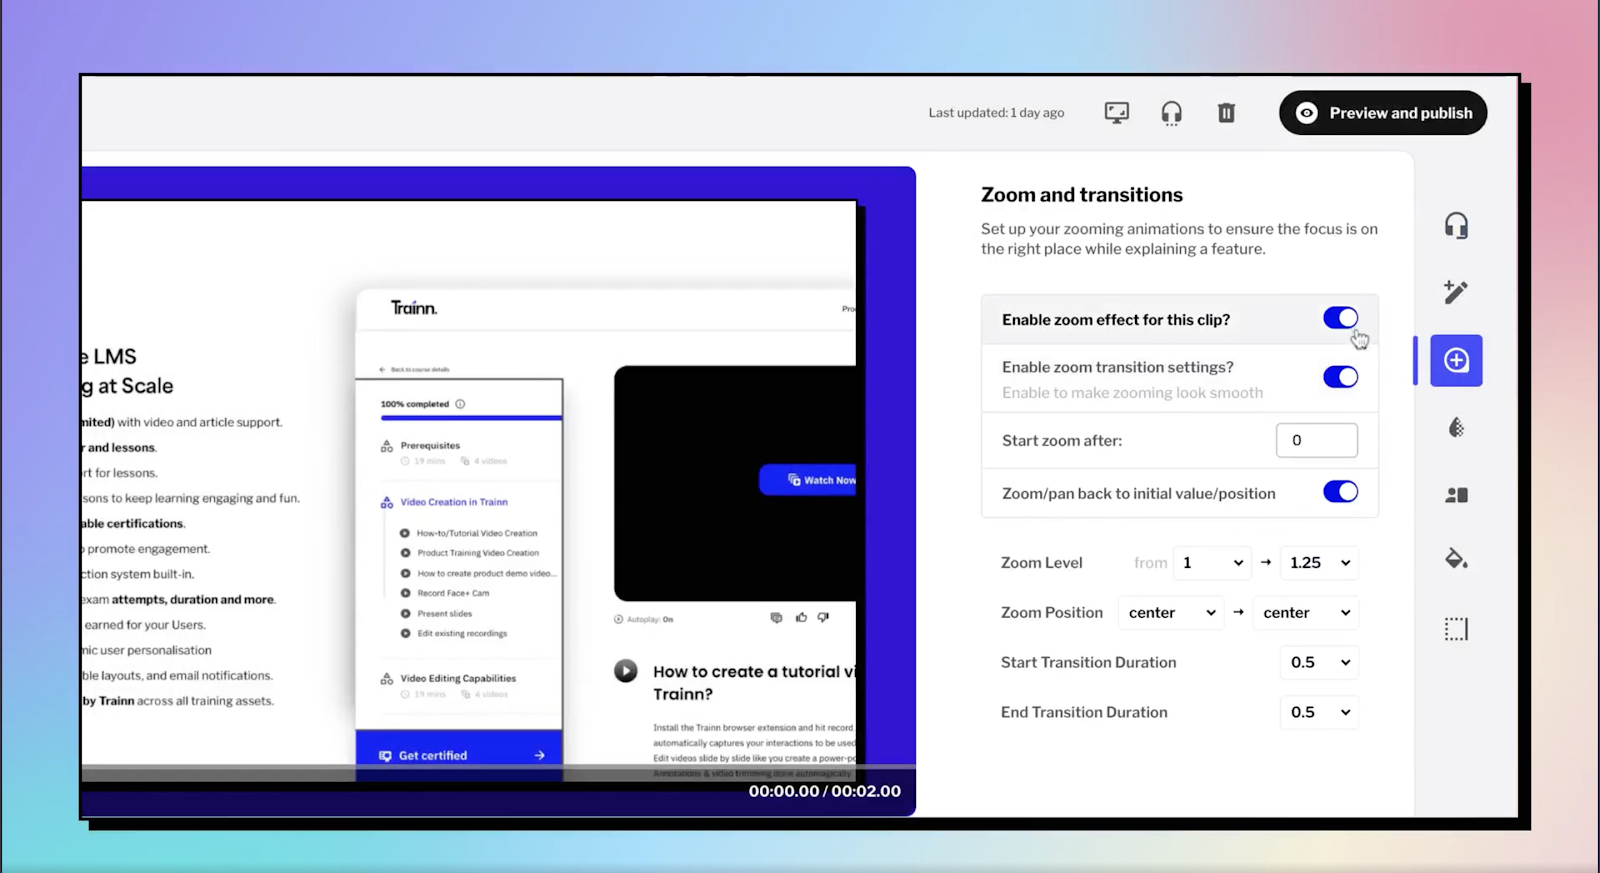
Start Zoom After: Enter the time from where the zoom-in should start.
Zoom/Pan back to the initial value/position: Select this option to return your clip to the original position after zooming.
Zoom Level: Select the level of zoom for your clip. You can enter any value, with 1 being the initial zoom level.
Zoom Position: Choose where the zoom should apply.
Start Transition Duration: Enter the time duration for the zoom transition.
End Transition Duration: Enter the time duration for the zoom transition back to its original state.
Once you've entered all of these windows settings, click on the 'Save Changes' button to apply the zoom effect.
Check out the free video to get a better understanding.
Removing Zoom From Videos
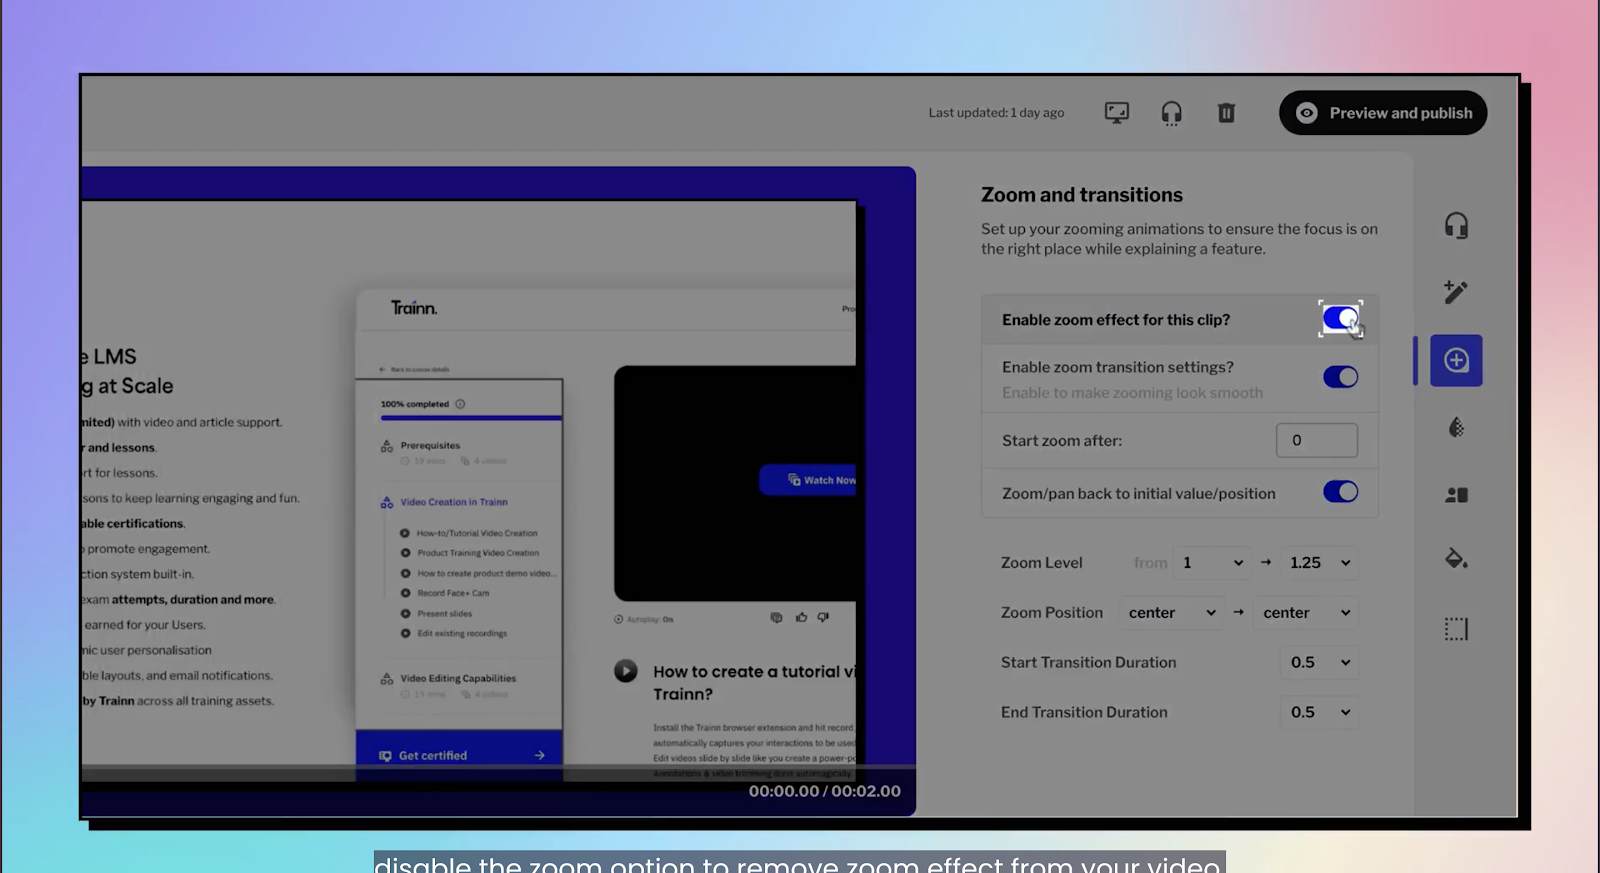
The process of removing zoom from videos is as simple as adding it. Simply navigate to the Zing video editing page and click on the Zoom option in the right-hand side panel. Next, disable the 'Enable Zoom Option for this clip?' and click on the 'Save Changes' button. This will remove the zoom effect from the clip.
You can also use Zing's editing features to make other adjustments to your videos, such as cropping, trimming, and adding captions. With Zing, you have the power to easily make any kind of video edits you need.
Check this video for a better understanding.
So why wait? Start creating videos with Zing today!
Conclusion:
In video content creation, mastering the art of zooming in on videos is no less than acquiring a superpower. It allows you to direct your viewer's attention, emphasize important details, and add a layer of professional editing to your videos.
Trainn can help you to smoothen your video content journey process with Zing! Embrace the art of zooming today and take your video content from mundane to mesmerizing, one zoom at a time.
Ready to Trainn your customers?
- Create videos & guides
- Setup Knowledge Base
- Launch an Academy
HANDPICKED FOR YOU

Elevate Your Corporate Videos with 7 Captivating Strategies and Real-life Examples (2024)

How to Make an Instructional Video for a Better Customer Experience

Why Training Videos for SaaS Businesses are Crucial and How to Make One
Trainn is a customer education platform for SaaS companies that enables customer-facing teams to create product training content-such as videos and guides-and deliver it across knowledge bases, learning management systems (LMS), and in-app experiences to support onboarding, product adoption, and customer success at scale.
North Bethesda, Maryland 20852


